
WordPress has decided to force us all to use Gutenberg, their Block Editor. This has created a new, less intuitive, and needlessly complicated “blogging experience” for those of us who regularly write posts. I’ve been at this since 2011 and despise being told I’m having a “blogging experience.” I write words and add pictures, for the love of Tolstoy. All I need is a simple, easy-to-use toolbar, which we did have in the classic editor and the old Admin Dashboard.
I don’t “experience,” and I don’t want to.
 While this mess of a blogging experience is utterly the worst example of bored people who aren’t bloggers deciding to fix a product that wasn’t broken, there are ways to make it work. Since we’re stuck with it, I will share what I’ve figured out.
There are two significant aspects of writing blog posts that I intend to cover this week. Today I am focusing on the easiest way to produce a decent-looking post despite WordPress’s efforts to the contrary. In the next post, I will cover the easiest way to insert and position images.
Step one: Write your post in a document. I use Word, but Google Docs or Open Office are great—any kind of word-processing document is fine.
Step two: After you’ve written it, let it sit for a day or two and then come back to it and check it for spelling and typos.
- Have the Read Aloud Function read it back to you and make changes as required. Trying to accurately make changes once it has been uploaded is a nightmare, so make it as perfect as you can before you upload it to WordPress.
- Use Grammarly or Pro Writing Aid to check for spelling and typos if you have access to them. They’re not cheap, so go out online and use the free versions—you’ll be glad you did.
Step three: Open WordPress by clicking on My Sites in the upper left corner of your website. Click on Posts and click on Add new Post.
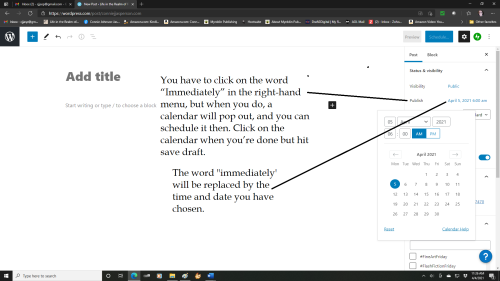
Step four: Schedule your post now so that it posts when you want it to. You have to click on the word “Immediately” in the right-hand menu, but when you do, a calendar will pop out, and you can schedule it then. Click on the calendar when you’re done but hit save draft.
Step five: Select a category and add your tags, and hit save draft.
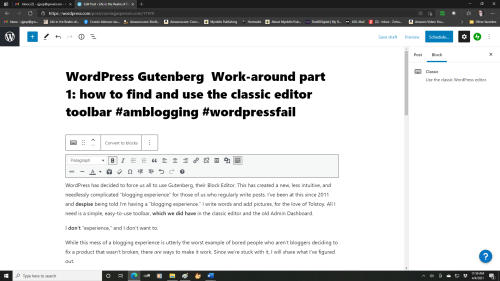
Step six: Hit the little blue square with the white plus sign in the upper left. It will turn black when you select it. An extensive, complicated menu will open. Look for the tiny little icon that looks like a keyboard. THIS IS THE CLASSIC EDITOR TOOLBAR. Click on it. A gray bar will appear on your screen. Click on that, and the old classic editor toolbar will appear.
![]()
BE WARNED: Any time you click on the body of your post, it may revert to the Block Editor. You may have to keep clicking on the classic editor.
Open your document and copy the title. Paste the title into the place marked title and hit save draft.
Step seven: Copy your document and paste it into the body of your post. Hit save draft.
When it comes to Grammarly and Pro Writing Aid, look at each instance the program flags, and then decide to change or keep it. Don’t just blindly accept their suggestions because they work on algorithms, not intuition.
I write my posts in advance because I want to make my work as clean and free from bloopers as possible. However, as my regular readers know, I don’t always catch typos and other things. In my word document, I use Grammarly to spell check and find most errors. Then I have the Read Aloud function of Word read my post to me. Hearing the mechanical voice read it back, I always find things Grammarly missed.
First of all, you must understand that each paragraph is a “block.” If you write your posts in a word document as I do and then copy and paste them, each paragraph will be its own entity. Try to remember this if you must make edits after you’ve pasted it into the body of the post, even if you use the classic editor.
Inserting and positioning images is much easier with the classic editor toolbar. I will discuss this in my next post.


My main gripe so far with the block editor is that I haven’t figured out how to indent text without choosing a “list” function. I used to do this all the time in the old editor, so that examples could be differentiated from the main text. I asked the support staff how to do this and they confirmed that the block editor did not offer these choices. I’m interested in your take on images. The old system of left, right, or center, with wrap-around text as needed, worked fine. Now you have to create an entire new block with complicated limitations to fold an image directly into the text. Glad to see I’m not the only one who hates “upgrades” for their own sake.
LikeLiked by 3 people
I did have to wait a week to write this post in order to cool down a bit, lol! I had a tantrum when they first did this to us, but I did a bunch of research and found the work-arounds. Inserting quotes that look good is still an option with the classic editor.
LikeLiked by 3 people
I’ve become resigned for more basic posts and reblogs. When my next ms. becomes a book and I have to get back to serious promotion, all bets are off! Thanks for doing this work.
LikeLiked by 3 people
We are working along the same lines today. I think the more people talk about how they are dealing with this new editor the better. It’s a transition we all have to make.
LikeLiked by 1 person
😀 Yes, a transition indeed. Based on how the next round of “improvements” goes, I may choose to migrate this blog to one of my other websites, which is an option not everyone has.
LikeLiked by 2 people
I no longer consider that an option, so I jumped in with the Block Editor last August, because I wanted to be ahead of WordPress on the switch,
LikeLiked by 2 people
Pingback: WordPress Block Editor work-around part 1: how to find and use the classic editor toolbar #amblogging #wordpressfail | Archer's Aim
I am seriously thinking of moving to a simpler playground, as getting too old for these shenanigans!
LikeLiked by 1 person
I don’t feel too old (although I’m old), but I don’t have time to waste on a format that doesn’t work for me. If they take away the classic editor toolbar, I will migrate this blog to one of my other websites, which are Blogger sites. WordPress’s strong point was how nice the finished product looked. When I am no longer able to deliver a professional-looking product with a minimum of agony, I will leave WordPress.
LikeLiked by 1 person
I have the feeling you will be in good company, Connie!
LikeLiked by 1 person
Pingback: WordPress Block Editor work-around part 2: Using Images the Easy Way with the Classic Editor Toolbar #amblogging #wordpressfail | Life in the Realm of Fantasy
Thanks for writing this; was wondering if I was just being a cantankerous person set in my ways or if there really is something excruciatingly flawed with the new interface in terms of user experience, productivity, etc.
I wish there were a way to get the Classic Editor back for real since the Classic Block doesn’t have all the features. Working with images is an absolute pain and my captions aren’t displaying as captions on published posts even though they look like captions in the editor. I’m not a pro blogger so I’m using a dot com not dot org site so my options for control are even slimmer as I can’t use plugins. Oh well. Guess all I can do is downgrade my plan in protest as I don’t feel like moving to another site entirely.
LikeLiked by 1 person
Hello, and welcome! I agree–I don’t want to move my site, because I have eleven years invested in this website. But, depending on how things play out over the next year or so, I will consider it. When authors ask me what platform I can recommend for both affordability and ease of use, I can no longer tell them WordPress. Instead, I am suggesting Google’s Blogspot, as it remains the easiest and most intuitive platform for new users with no programming experience to create a nice looking site.
LikeLiked by 1 person