WordPress has decided to force us all to use Gutenberg, their Block Editor. This has created a new, less intuitive, and needlessly complicated “blogging experience” for those of us who regularly write posts. I’ve been at this since 2011 and despise being told I’m having a “blogging experience.” I write words and add pictures, for the love of Tolstoy. All I need is a simple, easy-to-use toolbar, which we did have in the classic editor and the old Admin Dashboard.
I don’t “experience,” and I don’t want to.
 While this mess of a blogging experience is utterly the worst example of bored people who aren’t bloggers deciding to fix a product that wasn’t broken, there are ways to make it work. Since we’re stuck with it, I will share what I’ve figured out.
There are two significant aspects of writing blog posts that I intend to cover this week. Today I am focusing on the easiest way to produce a decent-looking post despite WordPress’s efforts to the contrary. In the next post, I will cover the easiest way to insert and position images.
Step one: Write your post in a document. I use Word, but Google Docs or Open Office are great—any kind of word-processing document is fine.
Step two: After you’ve written it, let it sit for a day or two and then come back to it and check it for spelling and typos.
- Have the Read Aloud Function read it back to you and make changes as required. Trying to accurately make changes once it has been uploaded is a nightmare, so make it as perfect as you can before you upload it to WordPress.
- Use Grammarly or Pro Writing Aid to check for spelling and typos if you have access to them. They’re not cheap, so go out online and use the free versions—you’ll be glad you did.
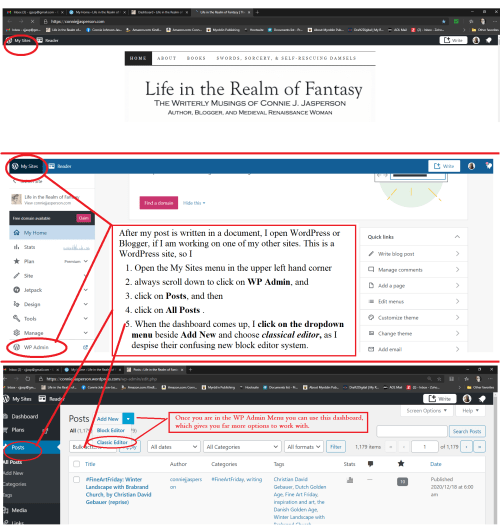
Step three: Open WordPress by clicking on My Sites in the upper left corner of your website. Click on Posts and click on Add new Post.
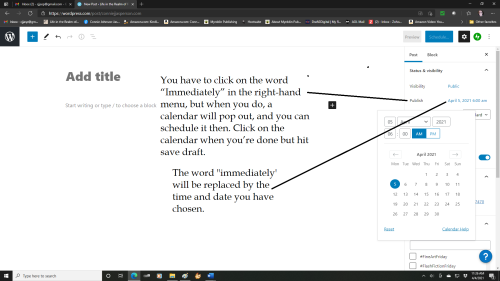
Step four: Schedule your post now so that it posts when you want it to. You have to click on the word “Immediately” in the right-hand menu, but when you do, a calendar will pop out, and you can schedule it then. Click on the calendar when you’re done but hit save draft.
Step five: Select a category and add your tags, and hit save draft.
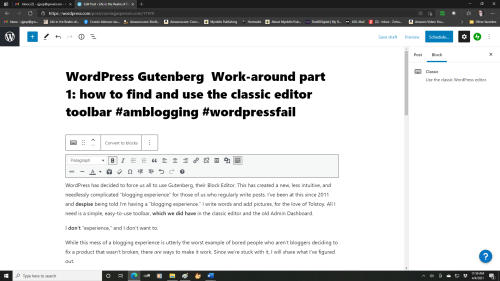
Step six: Hit the little blue square with the white plus sign in the upper left. It will turn black when you select it. An extensive, complicated menu will open. Look for the tiny little icon that looks like a keyboard. THIS IS THE CLASSIC EDITOR TOOLBAR. Click on it. A gray bar will appear on your screen. Click on that, and the old classic editor toolbar will appear.
![]()
BE WARNED: Any time you click on the body of your post, it may revert to the Block Editor. You may have to keep clicking on the classic editor.
Open your document and copy the title. Paste the title into the place marked title and hit save draft.
Step seven: Copy your document and paste it into the body of your post. Hit save draft.
When it comes to Grammarly and Pro Writing Aid, look at each instance the program flags, and then decide to change or keep it. Don’t just blindly accept their suggestions because they work on algorithms, not intuition.
I write my posts in advance because I want to make my work as clean and free from bloopers as possible. However, as my regular readers know, I don’t always catch typos and other things. In my word document, I use Grammarly to spell check and find most errors. Then I have the Read Aloud function of Word read my post to me. Hearing the mechanical voice read it back, I always find things Grammarly missed.
First of all, you must understand that each paragraph is a “block.” If you write your posts in a word document as I do and then copy and paste them, each paragraph will be its own entity. Try to remember this if you must make edits after you’ve pasted it into the body of the post, even if you use the classic editor.
Inserting and positioning images is much easier with the classic editor toolbar. I will discuss this in my next post.