
‘Life in the Realm of Fantasy’ is a WordPress blog. I originally went with WordPress for this website because it is a free, open-source blogging tool and content management system. I also have several other blogs on Blogger (Blogspot/Google), also a free, open-source blogging tool and content management system.
 I prefer Blogger for ease of use, but I love the way WordPress looks when you get to the finished product stage. I do pay an annual fee to both WordPress and Blogger so that my readers aren’t subjected to random and sometimes obscene-looking advertisements.
We discussed how to find and use the classic editor tool bar in the Block Editor menu in my last post: WordPress Block Editor work-around part 1: how to find and use the classic editor toolbar. Today we’re going to source and use images to make our posts more eye-catching.
Open the Classic Editor Toolbar. Once you have your text the way you want it, it’s time to add images.
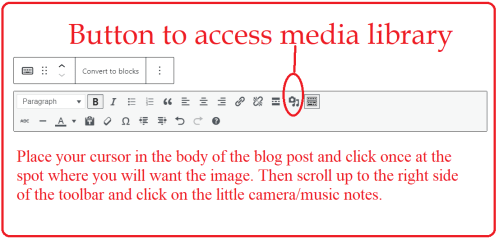
Place your cursor in the body of the blog post and click once at the spot where you will want the image. Then go to the right side of the ribbon/toolbar and click on the little camera/music notes.(When you hover your mouse over it, it will say ‘add media shift/alt/M).
When the image loads, click on it and a small toolbar will appear.
- Position your photo via the small toolbar. Do this first!
- To change the size of the image, click on the little white square in the upper right of the image. Hold it and drag the image to the size you want.

If this is your first blog post, you won’t have anything in your media library yet, so click on “Upload Files.” Practice uploading images and inserting them, playing with it until you feel comfortable and know how to ensure the image will appear where you want it, and will be the size you want it to be. Then, once the image is in the body of the post, you click on the picture, and a new toolbox opens up. That is where you make your adjustments for positioning and size. You can even add captions.
But how do we find our images?
When we first begin blogging, sourcing images seems like no big deal. You google what you want, see what images pop up, right click, copy, and use them, right?
Wrong! Photographers and artists are just like writers—they are proud of their work and want to be credited for it. Protect yourself and your work by responsibly sourcing your images, giving credit to the authors and artists whose work you use.
You can get into terrible financial trouble and lose your credibility if you use images you don’t have the right to use.
A very good friend recently pointed out that even if you reblog a post where the images weren’t sourced properly, you might get into trouble, even though you reposted it in good faith.
I’ve mentioned this post before: The $7,500 Blogging Mistake That Every Blogger Needs to Avoid!
 So, now that we are clear as to our legal responsibility, what does the cash-strapped author do? I go to Wikimedia and use images that are in the public domain, and I also create my own graphics.
An excellent article on using Creative Commons Images can be found here:
Wikimedia makes it easy for you to get the attributions and licensing for each image.
Another good source I have used is Allthefreestock.com, where you can find hundreds of free stock photos, music, and many other things for your blog and other projects.
Sometimes I need images I can only get by purchasing the rights to them. I’m not rich, so for those, I go to Dreamstime or Canstock, and several other reputable sources. For a few dollars, usually only two or three, I then have the right to use the image of my choice, and it’s properly licensed.
The proper legal attribution is also there on the seller’s website, clearly written out with the copyright and artist name, so all you need to do is copy and paste it into your footnotes.
 I keep a log of where my images are sourced, who created them, and what I used them in. One thing WordPress has either removed or hidden is the ability to insert the attribution into the image details so that when a mouse hovered over the image, curious readers could go to the source. But that doesn’t seem to be an option any more.
Since we’re talking about citing our sources, what about quoting an article or other literary work? Sometimes we want to quote another blogger or use the information we have learned from them.
Plagiarism is a bad word, and you never want to be accused of it. To that end, we cite our sources—but there is a caveat here:
- If we are quoting from a book and we intend to publish that passage in our book, we go to the publisher and get legal written permission to do so.
- If we can’t get legal written permission to quote them in our book, we do not use that quote.
Composing the body of my post in a document rather than WordPress’s content window allows me to spell check and edit my work first, and I feel more comfortable writing in a document.
I keep a log at the bottom of my page of what website, who the author was, the date of publication, and the date I accessed it. I have found the simplest method is to list them in this order:
- Author/contributors (for Wikipedia quotes, use “Wikipedia Contributors” rather than author names)
- Title of article/book
- Publication or website title
- Link to the article
- Date you accessed it.
Simple attributions/citations will look like this in the footnotes:
Wikipedia contributors, “Gallows humor,” Wikipedia, The Free Encyclopedia, https://en.wikipedia.org/w/index.php?title=Gallows_humor&oldid=759474185 (accessed January 30, 2017).
When you quote from Wikipedia, citation is simple. ‘Cite this page’ is listed in the left-hand menu under ‘tools.’
Clicking on this link takes you to a page offering citations for that page in CMoS, APA, or MLA style, whichever suits your need. Just copy and paste the one you prefer into your footnotes, and your due diligence has been done.
 All this information for your images and any quotes from other sources should be listed at the BOTTOM of your current document as you find it, so everything you need for your blog post is all in one place.
When my blog article is complete and ready to post, I will insert a line to separate the body of the post from the credits and attribution notes.
Authors should talk to the reading world about who they are and what they do. There is no better way to connect with potential readers than by talking to them. Using pictures and quoting good sources makes your website more interesting and informative.
Hopefully, this has helped you be more comfortable in finding and using the classic editor to position your images within the body of your posts.
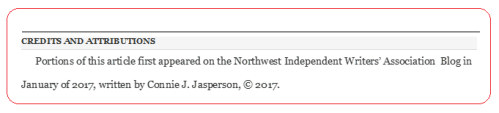
Credits and Attributions:
All images, screenshots, and graphics in this post are the author’s own work.
Free-range Pansies, © 2021 by Connie J, Jasperson
Sentinel, © 2019 by Connie J. Jasperson


