
I’m in the process of formatting a manuscript for publication, both for the paper version and the book version. While there are significant differences between the layout of the two types of documents, some fundamental things remain the same.
I create three manuscripts. Before I embark on making mobi files for Kindle or designing the interior of my paper book, I create a base manuscript, one which has been thoroughly combed by my writing posse. At this point, it is as well-edited as we can get it.
Name it as the BookTitle_Final_.doc
I strongly suggest you save it as a Word 97 – 2003 compatible document (NOT a template) rather than as a .docx. Saving as a compatible document ensures fewer problems in the upload.
I have made several screenshots with the following steps highlighted for you, so if my instructions aren’t clear, my garbled artwork can confuse you even more.
I open my final base manuscript, and using select all, I highlight the entire thing. I have a list of things to check for.
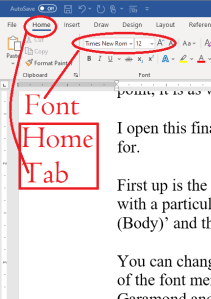 First up is the Font. Go to the font group, on the left-hand end of the ribbon. Unless you write with a particular font, the default font, or pre-designed value or setting, will probably say ‘Calibri (Body),’ and the size will be .11.
You can change this on the home tab by clicking on the little grey square in the right-hand corner of the font menu and accessing the drop-down menu. Scroll down to Times New Roman or Garamond and set it to .12. A standard serif font is easiest on the eyes. Clicking on that will change the font for the whole thing (if you used select all to highlight the entire ms).
Next on the list is eliminating the random extra spaces that somehow find their way into my work as I go. Extra spaces interfere with formatting for eBooks and other electronically uploaded applications. Other than at a few specialty printers, ALL books and magazines are uploaded electronically nowadays, even printed books.
Extra spaces are most frequently found at the end of sentences, or where you have cut and pasted a passage. For older authors, there may be two spaces at the end of every sentence. When I was learning to type in school, they taught us to hit the space bar twice (two spaces) between sentences, for the sake of readability.
That was a difficult habit to break, but it must be done.
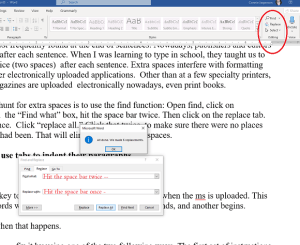 The simple way to hunt for extra spaces is to use the “find function” in the upper right corner of your toolbar:
- Open Find, click on “advanced find.”
- In the “Find what” box, hit the space bar twice.
- Then click on the replace tab.
- In the replace with box, hit the space bar once.
- Click “replace all.”
- Click that twice, to make sure there were no places where three spaces had been inadvertently inserted.
That will eliminate all the extra spaces.
I use “control-F” to open the Navigation Pane because it highlights the spaces in yellow, making them easy to see. The instructions are the same as when opening Find by using the toolbar. But for people who are new to word processing programs or who don’t use MS Word, using the toolbar on the ribbon is the simplest method.
Next, I make sure my paragraphs all look the way I want them to.
Some authors still use tabs to indent their paragraphs.
Don’t do it.
If you used the tab key to indent your paragraphs, the indents fail when the ms is uploaded. This creates a wall of words with no way to tell where one paragraph ends, and another begins.
Publishers hate it when that happens.
If you have done that, you can fix it by using one of the two following ways. The first set of instructions only work if you have a ten-key pad on your keyboard.
To remove tabs from a manuscript in Word or most other word-processing programs, open the “Find” box (right side of the ribbon on the home tab). In the “Find” field, type in ^t. (press the alt key 94 to make ^ and key the t) This only works if you have a ten-key (number pad) at the right side of your keyboard. ^t.
Then click “Replace.” In this field, type nothing. One click on “Replace all” will remove every tab.
That will leave you with no indents whatsoever.
If you don’t have a ten-key pad on your keyboard, you will have to remove each one by hand, which is a daunting task no publisher or editor has time for. Beginning with the first paragraph on the first page, scroll down and use the backspace key to remove the tab indenting every paragraph.
This will temporarily make your ms look like a wall of words, but you are going to resolve that the right way.
Once the tabs are all removed, use the following instructions to format paragraphs.
There are two ways to do this.
The easiest way is to open the “home” tab, click on “select all,” and with the manuscript highlighted, choose “normal” from the “styles” tab on the ribbon.
If your word processing program doesn’t have that option, you can format the paragraphs by using the simple formatting tool:
 Step 1: On the Home tab, look in the group labeled ‘Paragraph.’ On the lower right-hand side of that group is a small grey square. Click on it. A pop-out menu will appear, and this is where you format your paragraphs.
Step 2: Justify the text. In justified text, the spaces between words and letters (known as “tracking”) are stretched or compressed. Justified text aligns with both the left and right margins. It gives you straight margins on both sides, but remember, this type of alignment only comes into play when a manuscript is being made ready for publication.
Step 3: Indentation: leave that alone or reset both numbers to ‘0’ if you have inadvertently altered it.
Step 4: Where it says ‘Special’: on the drop-down menu select ‘first line.’ On the ‘By’ menu, select ‘0.5.’ (You can specify a different number, 0.3 or 0.2, but 0.5 is standard.)
Step 5: ‘Spacing’: set both before and after to ‘0.’
Step 6: ‘Line Spacing’: set to ‘single.’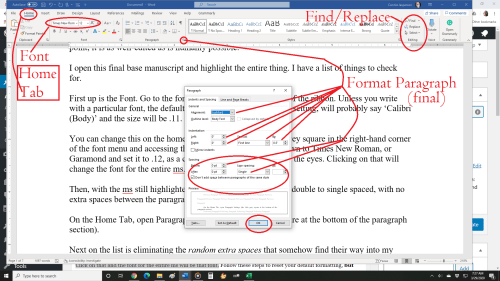 This kind of formatting is not for work you are submitting to an agent, editor, or publisher. This is for a finished product that you intend to publish yourself.
You can get fancy with your layout, but remember, when it comes to eBooks, simple is better because it’s less distracting and less likely to fail in the upload.
I take this finished base manuscript to Draft2Digital and create my eBook and Mobi files there. As a member of Myrddin Publishing Group, I have all the ISBNs I need, but you can use theirs at no cost if you choose.
I use an old CreateSpace template to make my paper books, and even with that premade template, it’s a bit of a hassle. But that is part of the fun of publishing your work.
Next up, on Wednesday, I’ll begin a 6 part series that will post on Thursdays, featuring five guest authors and publishers who will discuss various aspects of Indie Publishing and how they negotiate the sometimes rough waters. I’m really looking forward to hearing what they have to say!


I have recently read that our favorite style guides have returned to the two-space rule between sentences to help enforce social wording. It may be just a rumor, however.
LikeLiked by 3 people
HAH! I shall try to remember that.
LikeLike
Hi, Connie. Your instructions are right on, especially the creative use of Find/Replace. I use this so extensively in edits that I created a free download showing how I find things like single quote marks where there should be double, or extra periods (I rend to read right past those when I’m proofing). It’s amazing what can sneak past human eyes.
I used InDesign to format my paperback interior. That does require a subscription to Adobe Creative Cloud, but it provides a lot of control. I self-published an ebook on my process, “Format Your Self-Published Paperback.” You can do a lot of the same things in Word, but I actually found Word harder to work with. My little book is slightly out of date now because there’s a 2020 update, but I’ve actually been using it to remember how to do things now that I’m formatting my second paperback. For example, I had to reformat to remove the first-line indent and create a drop cap for the first paragraph of each chapter–something I hadn’t realized I ought to be doing!
If you don’t mind my sharing the link here, the download and link are at justcanthelpwriting.com. My steps are a lot like yours. I always find your advice to be superb.
LikeLiked by 1 person
Hello! Those are steps I didn’t go into, because I’m struggling to do just those things. I haven’t done this in a while but have three books to format in the upcoming year. Thus I need to get a rhythm so these nice little things are included in such a way they don’t cause my upload to fail. I’m taking notes of things that cause tears on my part, and the solutions. Thank you for the link!
LikeLike
Reblogged this on Chris The Story Reading Ape's Blog.
LikeLike
I LOVE Draft2Digital! If you are just starting a manuscript, read their very simply and easy to understand formatting guidelines first. By the time you type “The End”, it will already be in great shape for the conversion process and you will have retrained yourself for the next one. Since Amazon no longer provides MOBI (or PDF) files for you, I use D2D to create one and use that when uploading into Amazon’s system. I also use the D2D file for sending out beta reader copies. The only negative is that Amazon’s process removes all the lovely little extra’s available from D2D (fancy action breaks, various styles,etc). I only publish eBooks, but the whole process is much easier and faster for me now.
LikeLiked by 1 person
I used D2D to format the mobi and eBook versions for Billy Ninefingers, but that was 2 years ago–it was easy then. I’m hoping the print version will be as simple, as formatting for print truly stinks, lol.
LikeLiked by 1 person
Agreed! I always keep the original manuscript and create a formatted copy to upload for the final eBook. Both get the same corrections and updates, though only the formatted version has the front and back matter. I’m sure your post will be helpful to many!
LikeLike
Pingback: Formatting the Final Manuscript #amwriting — Life in the Realm of Fantasy | When Angels Fly