You have written a short story and edited it. You have decided what publication you want to submit it to. Now you must format the manuscript to make it submission-ready. Your next steps will show the prospective publisher your level of professionalism.
 Editors at magazines, contests, and publishing houses have no time to deal with poorly formatted manuscripts. Their inboxes are full of properly formatted work, so they will reject the amateurs without further consideration.
You must learn to use your word-processing program. I use Microsoft Word, but Google Docs and Open Office are very similar.
FIRST: Read the submission guidelines your prospective publisher has posted on their website and follow them.
Publishers who accept electronic submissions will most likely want them formatted similarly. For the most part, this formatting is basically the same from company to company, so once you know what the industry standard is, it’s easy to make your manuscript submission-ready, at least in the area of formatting.
Running across the top of the page in your word-processing program is the ribbon (toolbar). Everything you need to create a manuscript is right there, waiting for you to learn to use it. Sometimes you can’t see it, and this is because it is hidden.
On the far right-hand side in Word is a tiny arrow for expanding or hiding the ribbon. We are going to expand it so we have access to all the tools we will need. If you are using a different program than mine, don’t be afraid to google how to unhide the toolbar/ribbon for your program.
 First, we must select the font. Every word-processing program has many fancy fonts you can choose from and a variety of sizes.
Use the industry-standard fonts: Times New Roman or Courier in 12 pt. These are called ‘Serif’ fonts and have little extensions that make them easier to read when in a wall of words.
If you are using MS WORD, here are a few simple instructions: to change your fonts, open your manuscript document, and click on the tab marked ‘Home.’ In the upper right-hand corner of the ribbon across the top of the page in the Editing group, click: select> select all. This will highlight the entire manuscript.
With the manuscript still highlighted, go to the font group on the ribbon’s left-hand end. The default font, or predesigned value or setting, will probably say ‘Calibri (Body),’ and the size will be .11.
You can change this by clicking on the menu. Scroll down to Times New Roman or Courier (depending on the publisher’s guidelines). Click on that, and the font for the entire ms will be that font. If you have clicked on the wrong font, it can be undone by clicking the back-arrow. Once you are satisfied with your changes, click Save.
Now we are going to format our paragraphs and line spacing. Editors and publishers want their copies double-spaced so they can insert comments as needed in the reviewing pane, which will be on the right side of the page when you receive your work back for revisions. Having it double-spaced allows for longer comments and is easier for an editor to read.
Do NOT ever use the tab key or the space bar to indent your paragraphs. If you used the tab key to indent your paragraphs, the indents might fail when the manuscript is electronically uploaded. This creates a wall of words with no way to tell where one paragraph ends and another begins.
If you have done that, you can fix it by using one of the two following ways.
To remove tabs from a manuscript in Word or most other word-processing programs, open the “Find” box (right side of the ribbon on the home tab). In the “Find” field, type in ^t. (Caret + lowercase t) (press the alt key 94 to make ^ and key the t). This only works if you have a ten-key (number pad) at the right side of your keyboard: ^t.
Then click “Replace.” In this field, type nothing. One click on “Replace all” will remove every tab.
That will leave you with no indents whatsoever. This will temporarily make your manuscript look like a wall of words, but you will resolve that the proper way.
If you don’t have a ten-key pad on your keyboard, you will have to remove each one by hand. Beginning with the first paragraph on the first page, scroll down and use the backspace key to remove the tab indenting every paragraph.
Once the tabs are all removed, use the following instructions to format paragraphs.
FIRST: SELECT ALL. This will highlight your entire manuscript.
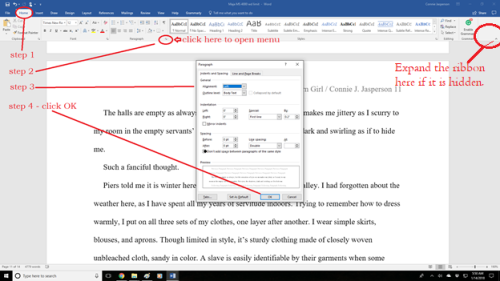
 Step 1: On the Home tab, look in the group labeled ‘Paragraph.’ On the lower right-hand side of that group is a small grey square. Click on it. A pop-out menu will appear, and this is where you format your paragraphs.
Step 2: On the indents and spacing tab of the menu: Use standard alignment, align LEFT. The reason we use this format is we are not looking at a finished product here. We are looking at a rough draft that will be sliced, diced, and otherwise mutilated many times before we get to the final product.
Step 3: Indentation: leave that alone or reset both numbers to ‘0’ if you have inadvertently altered it.
Step 4: Where it says ‘Special’: on the dropdown menu, select ‘first line.’ On the ‘By’ menu, select ‘0.5.’ (Some publishers will specify a different number, 0.3 or 0.2, but 0.5 is standard.)
Step 5: ‘Spacing’: set both before and after to ‘0.’
Step 6: ‘Line Spacing’: set to ‘double.’
To summarize, standard paragraph format has:
- margins of 1 inch all the way around
- indented paragraphs with no extra space between
- double-spaced text
- Align Left. This is critical.
 Do not justify the text. In justified text, the spaces between words and letters (known as “tracking”) are stretched or compressed. Justified text gives you straight margins on both sides. However, this type of alignment only comes into play when a manuscript is published. At that point, the publisher will handle the formatting.
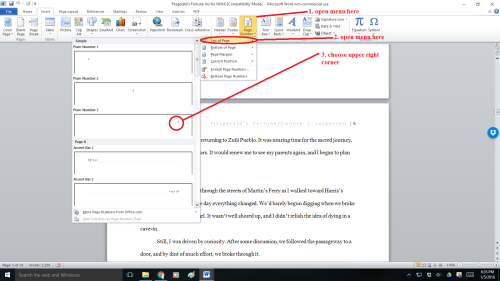
Now we need to make the “Header.” This is the heading at the top of each page of a word-processed or faxed document, consisting of page numbers, title, and author name. If an editor likes your work, they might print it out to look at it more closely. If the printout of the manuscript falls off a desk, it can easily be reassembled because the pages are numbered.
We insert the header by opening the “insert” tab and clicking on “page number.” This opens a new menu. We add the page numbers using the small dropdown menu.
This is how the ribbon and menus look:
 Now your manuscript is submission-ready. It is in Times New Roman or Courier .12 font, is aligned left, has1 in. margins, is double-spaced, has formatted indented paragraphs.
The header contains the title and your pen name. The first page contains your legal name, mailing address, contact information in the upper left-hand corner, and the word count on the right.
 This may seem like overkill to you. If you are serious about submitting your work to agents, editors, or publishers, it must be as professionally formatted as is possible.
I hope these general instructions will help you find success, but be sure to check the publisher’s website as each publisher may have different requirements. If you don’t follow your prospective publisher’s submission guidelines, you have wasted your time submitting it.


Reblogged this on Chris The Story Reading Ape's Blog.
LikeLiked by 1 person
❤ Thank you, Chris ❤
LikeLiked by 1 person
Welcome, Connie 🤗❤️🤗
LikeLike